📣 Pglet was superseded by Flet project with Flutter UI that works on web, mobile and desktop platforms. Give it a spin and join our active and growing community on Discord.📣
New page events: connect and disconnect for real-time chat-like experiences.
Harmonization of border styling propeties across Stack, Image, IFrame and Text controls: HTML-ish border property with mixed and confusing to non-web devs semantics (1px solid black or solid 1px black?) replaced with clean and simple border_style, border_width and border_color properties.
All boolean and enum-like properties are protected with beartype.
Staying in touch with your users via email is still an effective and reliable communication channel. In this tutorial we are going to implement email signup form for a React-based static website that allows users to submit their email address and subscribe to a project mailing list. We are going to implement "double opt-in" process where upon signup an email is sent to the user which includes a link to click and confirm the subscription.
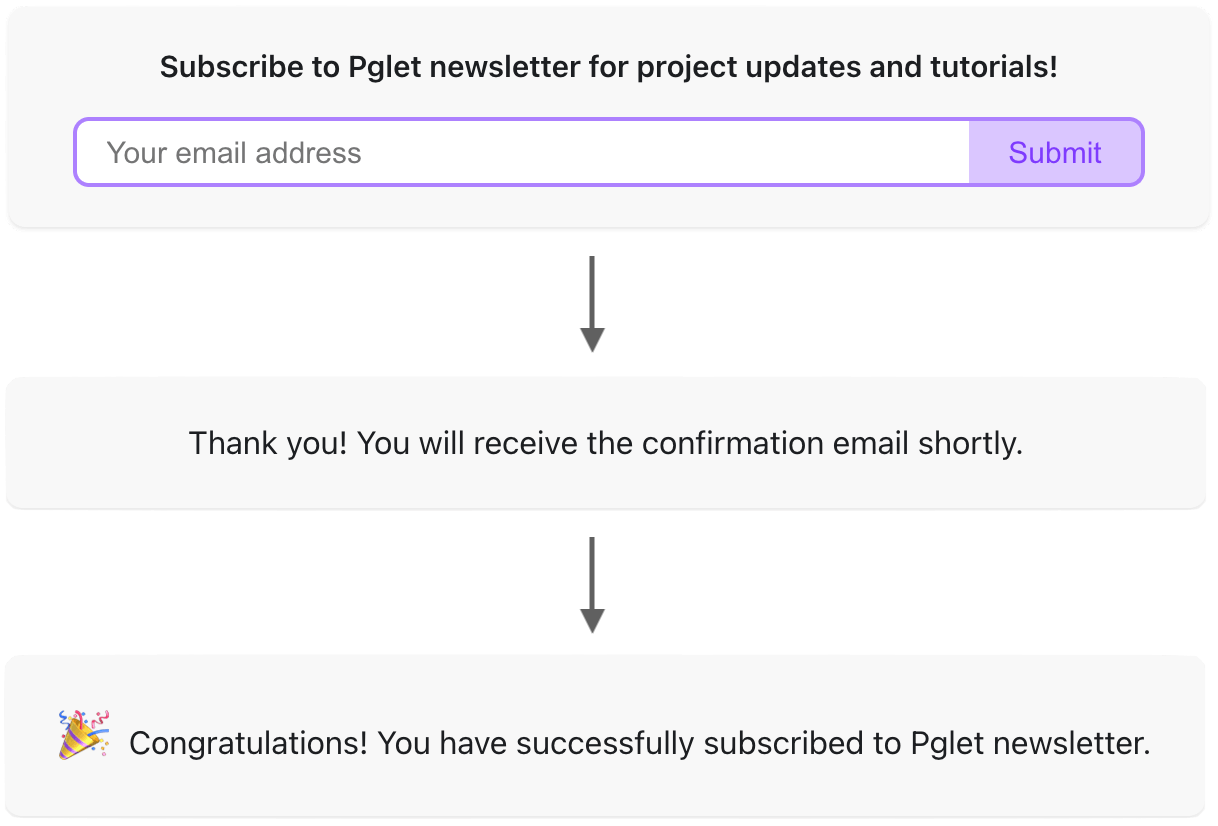
The form must be as simple as possible: just "email" field and "submit" button.
The form must protected by CAPTCHA.
Double opt-in subscription process should be implemented: after submitting the form a user receives an email with a confirmation link to complete the process.
For CAPTCHA we are going to use hCaptcha, which is a great alternative to Google's reCAPTCHA and has a similar API.
A signup form requires server-side processing and for that we re going to use Cloudflare Pages Functions which are a part of Cloudflare Pages platform.
For maintaining mailing list and sending email messages we are going to use Mailgun. Mailgun offers great functionality, first-class API at a flexible pricing, plus we have a lot of experience with it.
It's simply <form> element with "email" and "submit" inputs - except hCaptcha, no other 3rd-party components or hooks were used.
Replace {YOUR-HCAPTCHA-SITE-KEY} with your own hCaptcha site key.
Captcha is verified on form.onSubmit event which supports submitting form with ENTER and triggers built-in form validators.
The result of captcha verification is stored in token state variable which is sent to /api/email-signup server function along with entered email for further verification and processing.
Add signup-form.js component to src/pages/index.js page:
When you run Docusaurus site with yarn start and navigate to a page with captcha at http://localhost:3000 you'll get "blocked by CORS policy" JavaScript errors. To make captcha work locally you should browse with a domain instead of "localhost".
Add a new mapping 127.0.0.1 mysite.local to sudo nano /private/etc/hosts and then you can open http://mysite.local:3000 with working captcha.
note
A part of form component is wrapped with <BrowserOnly> element which tells Docusaurus that the contents inside <BrowserOnly> is not suitable for server-side rendering because of client-side API used, in our case window.location.ref. You can read more about <BrowserOnly>here.
Mailgun is a transactional email service that offers first-class APIs for sending, receiving and tracking email messages.
note
We are not affiliated with Mailgun - we just like their service and have a lot of experience with it.
Some advice before creating a mailing list in Mailgun:
Start with a free "Flex" plan - it allows sending 5,000 messages per month and includes custom domains.
Configure custom domain - of course, you can test everything on a built-in {something}.mailgun.org domain, but messages sent from it will be trapped in recipient's Junk folder. Custom domain is included with a free plan and setting it up is just a matter of adding a few records to your DNS zone.
Get dedicated IP address - if you require even greater email deliverability, assign your domain to a dedicated IP address. Dedicated IP is part of "Foundation" plan which starts at $35/month.
Be aware that Functions runtime environment is different from Node.js - you can't use Node.js built-in modules, you can't install anything from NPM. It's more like JavaScript in a headless browser with fetch(), WebSocket, Crypto and other Web APIs.
For signup form, we are going to add two functions:
POST /api/email-signup - for initial form processing and signup
GET /api/confirm-subscription?email={email}&code={code} - for confirming subscription
To generate routes above, we need to create two files: /functions/api/email-signup.js and /functions/api/confirm-subscription.js in the project repository.
caution
/functions directory must be in the root of your repository, not in /static directory, and must be published along with the site.
You can glance through Functions docs to become familiar with the technology. Here I'll only cover some tricky issues which could arise while you develop.
First, it's possible to run and debug your functions locally. A beta version of Wrangler tool should be installed for that:
yarn add wrangler@beta --save-dev
caution
Disregard scary deprecation warning while looking for wrangler package on npmjs.com and don't install @cloudflare/wrangler as it suggests.
Apparently, Cloudflare team is actively working on Wrangler v2 and publishes it as wrangler package.
Run Wrangler as a proxy for your local Docusaurus run:
npx wrangler pages dev -- yarn start
For configurable settings in functions we use environment variables. In contrast with Cloudflare Workers, environment variables are not set as globals in your functions, however they can be accessed via handler's context, like that:
where API_KEY is the name of environment variable.
For Workers environment variables can be configured in wrangler.toml, but wrangler.toml is not supported by Functions, so the only way to test with environment variables locally is to pass them via command line with -b switch:
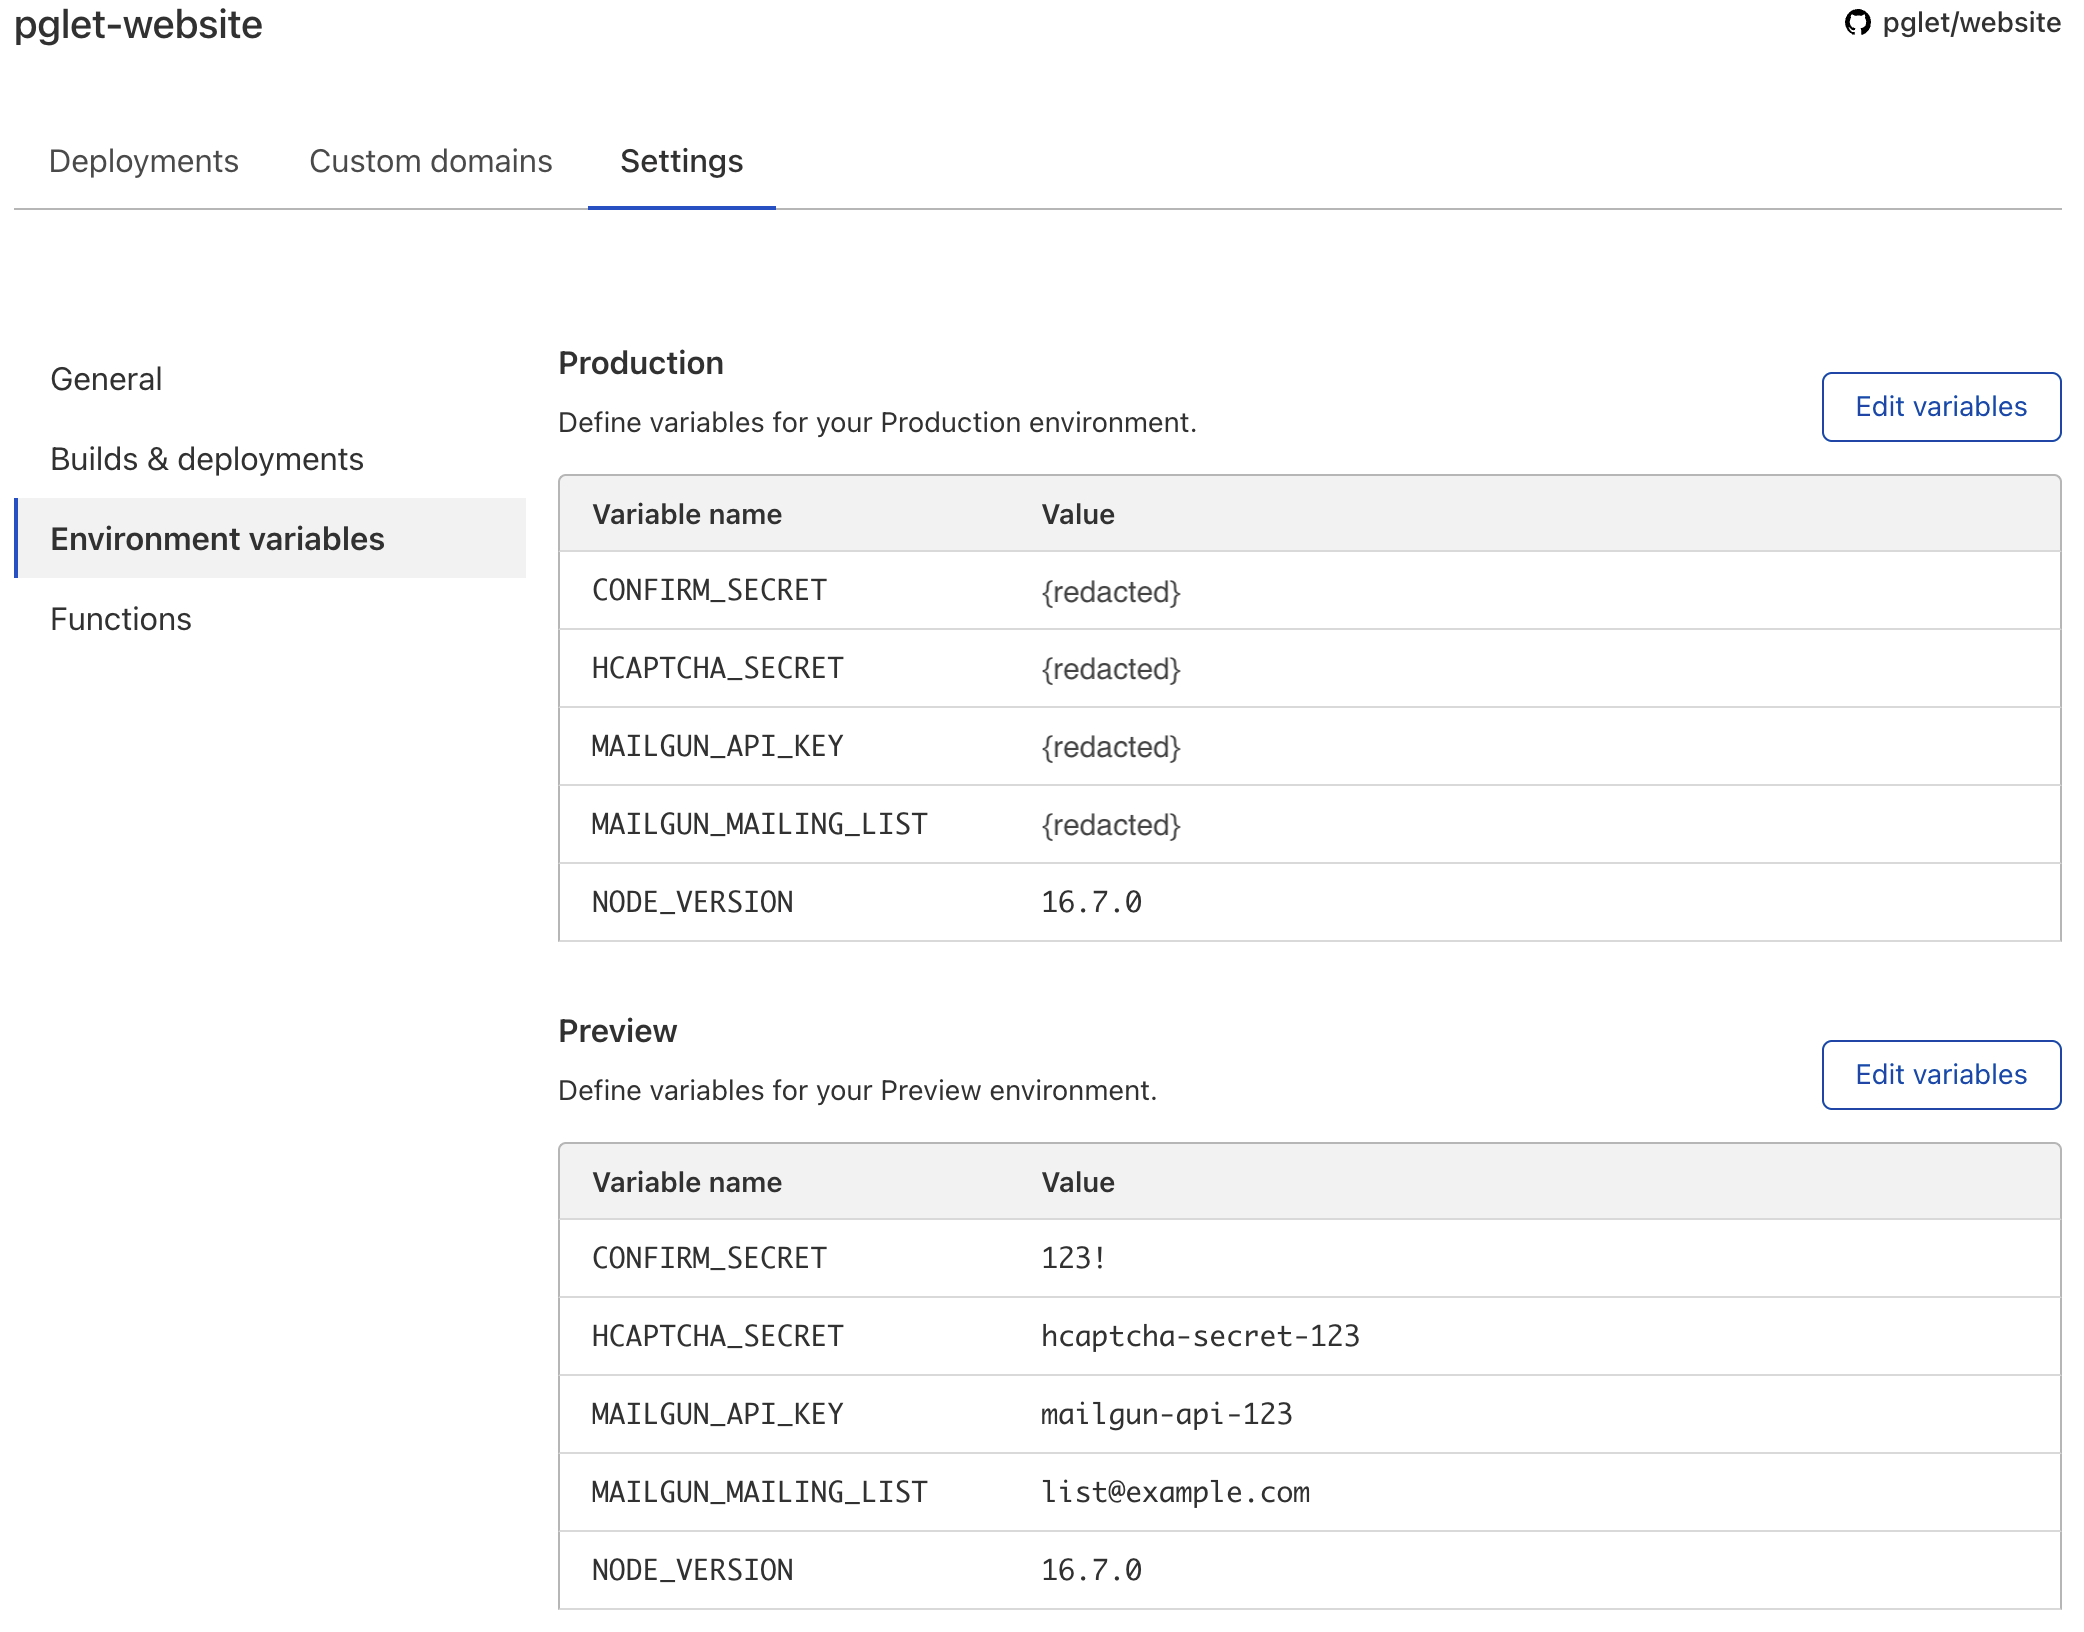
For your Cloudflare Pages website, you can configure Production and Preview environment variables on Settings → Environment variables page:
info
Environment variables are immutable. If you update/add/delete environment variable and then call the function using it again, it won't work - once variables have changed, the website must be re-built to pick up new values.
danger
Do not put real secrets into "Preview" environment variables if your project in a public repository. Any pull request to the repository publishes "preview" website to a temp URL which is visible to everyone in commit status. Therefore, it's possible for the attacker to submit malicious PR with a function printing all environment variables and then run it via temp URL.
Validating hCaptcha response on the server is just a POST request to https://hcaptcha.com/siteverify with hCaptcha response received from browser and hCaptcha site key secret in the body:
The function for sending confirmation email message to a user via Mailgun is just a few lines:
asyncfunctionsendEmail(mailgunApiKey, mailDomain,from, to, subject, htmlBody){ const data ={ from:from, to: to, subject: subject, html: htmlBody } const response =awaitcallMailgunApi(mailgunApiKey, 'POST',`https://api.mailgun.net/v3/${mailDomain}/messages`, data) if(response.status!==200){ const responseBody =await response.text() throw`Error sending email message: ${responseBody}` } }
An interesting part here is how confirmation URL is built, which is sent in the message and should be clicked by a user to confirm subscription.
Confirmation URL contains two parameters: email and confirmation code. Email is just recipient's email address which is, obviously, not a secret. Confirmation code is calculated as sha1(email + secret), with secret known to the server only.
When the server receives a request with email and confirmation code, it calculates a new confirmation code for the received email and compares it with the code from the request.
The algorithm could be further improved by implementing expiring confirmation code, but we want to keep it simple for now.
In this article we created an email signup form for Docusaurus website protected with hCaptcha. The form allows user to submit their email address and subscribe to a project mailing list. We implemented "double opt-in" process, where upon signup an email is sent to the user which includes a link to click and confirm the subscription. We used Cloudflare Pages Functions to implement all server-side logic. Mailgun service was used to send email messages and maintain mailing list.
In the next article we will build an interactive Python app using Pglet for sending newsletter to Mailgun mailing lists. Make sure to subscribe to Pglet mailing list not to miss it!
While working on this release Pglet made HN home page, got included into TLDR newsletter and topped 500 stars on GitHub (hey, if you enjoy using Pglet give it a ⭐️)! That was exciting - we received great feedback from real users! Many of those comments/requests were incorporated in the release.
Originally, Pglet was using Redis-like text-based protocol to modify web page controls. There was a proxy process running between a client library and Pglet server translating text commands to WebSocket messages understood by the server. A client library was communitcating with a proxy via Unix named pipes (or named pipes on Windows). Such design was chosen because initially Pglet was made to work with Bash and named pipes is what natively supported there. By adding clients for other languages such as Python and C#/PowerShell it became obvious that the layer of named pipes, command parser/translator and proxy process leads to increased complexity.
With the release of Pglet v0.5, client libraries for Python and C#/PowerShell were re-written to communicate directly with Pglet server via WebSocket protocol. Proxy process is no longer required. As a bonus, when a user application is exiting (CTRL+C), a client library is now sending correct WebSocket closing command to the server, so the app instantly becomes "inactive" and is removed from the server.
Versions of Pglet Server and its clients follow SemVer format: MAJOR.MINOR.PATCH.
MAJOR part of the version will be changed when Pglet Server API changes break backward compatibility. For now it's 0 meaning there are no drastic changes to the API and it's not mature enough to become 1. All client libraries will follow the same MAJOR number.
Pglet clients could have MINOR version part greater or equal than Pglet server. When the next 0.6 version of Pglet server is released, all client libraries will be bumped to 0.6 as well.
PATCH version part is completely independent for Pglet server and all client libraries.
It looks like initially licensing Pglet under AGPL was "premature optimization". Yes, we may want to monetize Pglet with a hosted service and AGPL would stop big cloud providers from forking our service and incorporating it into their cloud offerings, but Pglet is very young project and, honestly, right now we don't foresee Microsoft copying it :)
On the other hand (A)GPL is used to be corporate-unfriendly license which reduces Pglet audience and slows adoption. We want every company using Pglet to build their internal tools!
So, we listened to your feedback and changed Pglet license to Apache License 2.0.
Streaming app UI to the web via hosted Pglet service (aka "Web" mode) is a primary use case for Pglet, so in the previous v0.4 release we made "web" mode default. However, after receiving feedback from users, we realized that an app needs to be tested locally before making it public. Therefore, in Pglet v0.5 we are reverting back "local" mode as default. As before Pglet Server is conveniently bundled into all client libraries to make local app development smooth and pleasant.
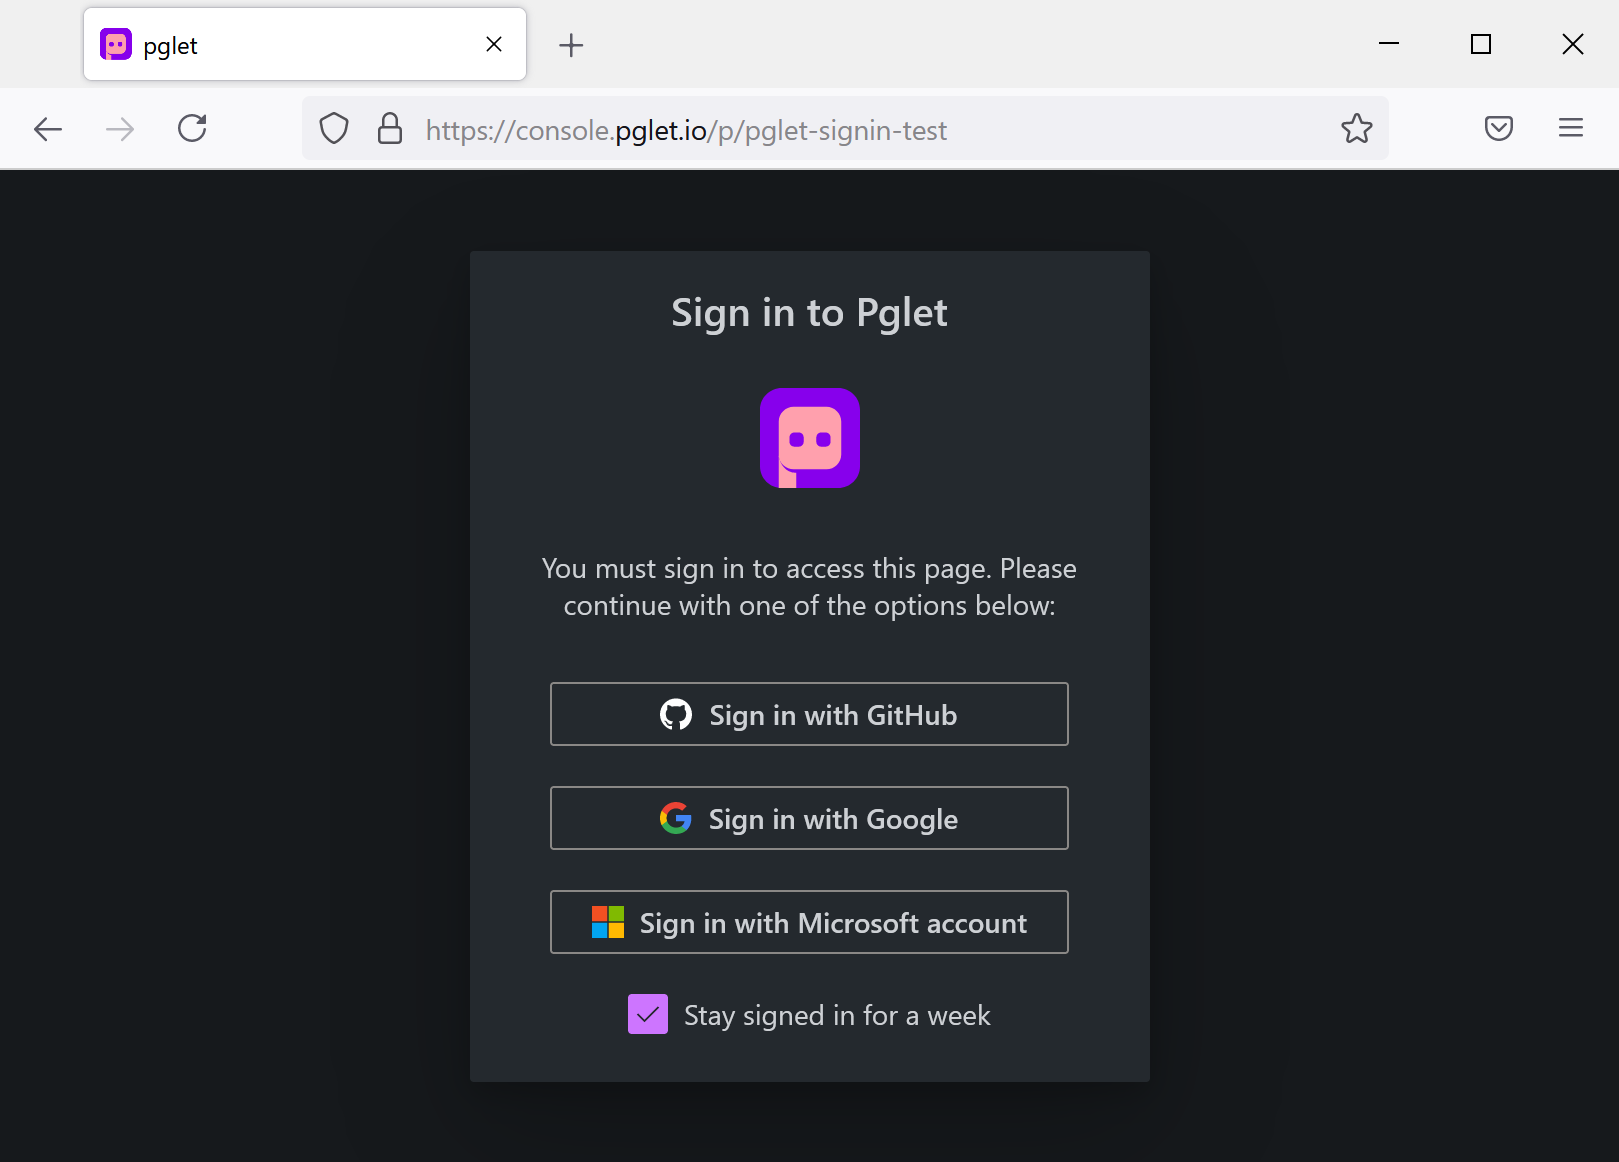
The major feature of Pglet 0.4.6 release is built-in authentication and authorization. Pglet now allows creating protected pages and apps which require users to sign in with any of three methods: GitHub, Google or Microsoft account (Azure AD):
Just imagine, you can instantly add authentication to any of your backend scripts!
For example, in Python to create a page accessible to GitHub user with username ExampleUser and all users in myorg/Developers team:
Starting from this relase when you start a new page or multi-user app with default parameters its UI will be streamed to https://console.pglet.io. To create a local page add local=True parameter (Python), for example:
page = pglet.page("my-app", local=True)# this page will start a local Pglet server page.add(Text('Hello, localhost!'))
Pglet hosted service was moved from app.pglet.io domain to console.pglet.io to emphasize the fact that Pglet is a secure web "console" where your backend apps can output reach progress.
A serious stabilization work has been done to make Pglet client more resilient to network fluctuations. Now your Pglet app will stay online for many days, reliably connected to Pglet service.
Pglet package now includes pglet executables for all platforms, so they are downloaded during the package installation - that better works for corporate or k8s environments without outbound internet access.
After publishing this post on Reddit PowerShell community we received great feedback about security. Currently Pglet service is in preview and is not recommended for use in production. We are working on built-in authentication/authorization functionality at the moment. It's going to be "Login with GitHub/Google/Microsoft" OAuth at first plus OpenID for any other providers.
Normally, to access computer via PowerShell you need to configure PowerShell remoting, open WinRM ports on firewall and, the most unpleasant part, add NAT rule on your router to expose a computer to the entire Internet.
So, how can I securely make a web UI for my script without any port opened on the firewall? I used Pglet - a free open-source service for adding remote UI to your scripts. Pglet acts as a relay between your script and a web browser. Your script "dials" the service and sends UI state updates while web users receive live page updates via WebSockets. Kind of Phoenix LiveView for PowerShell :)
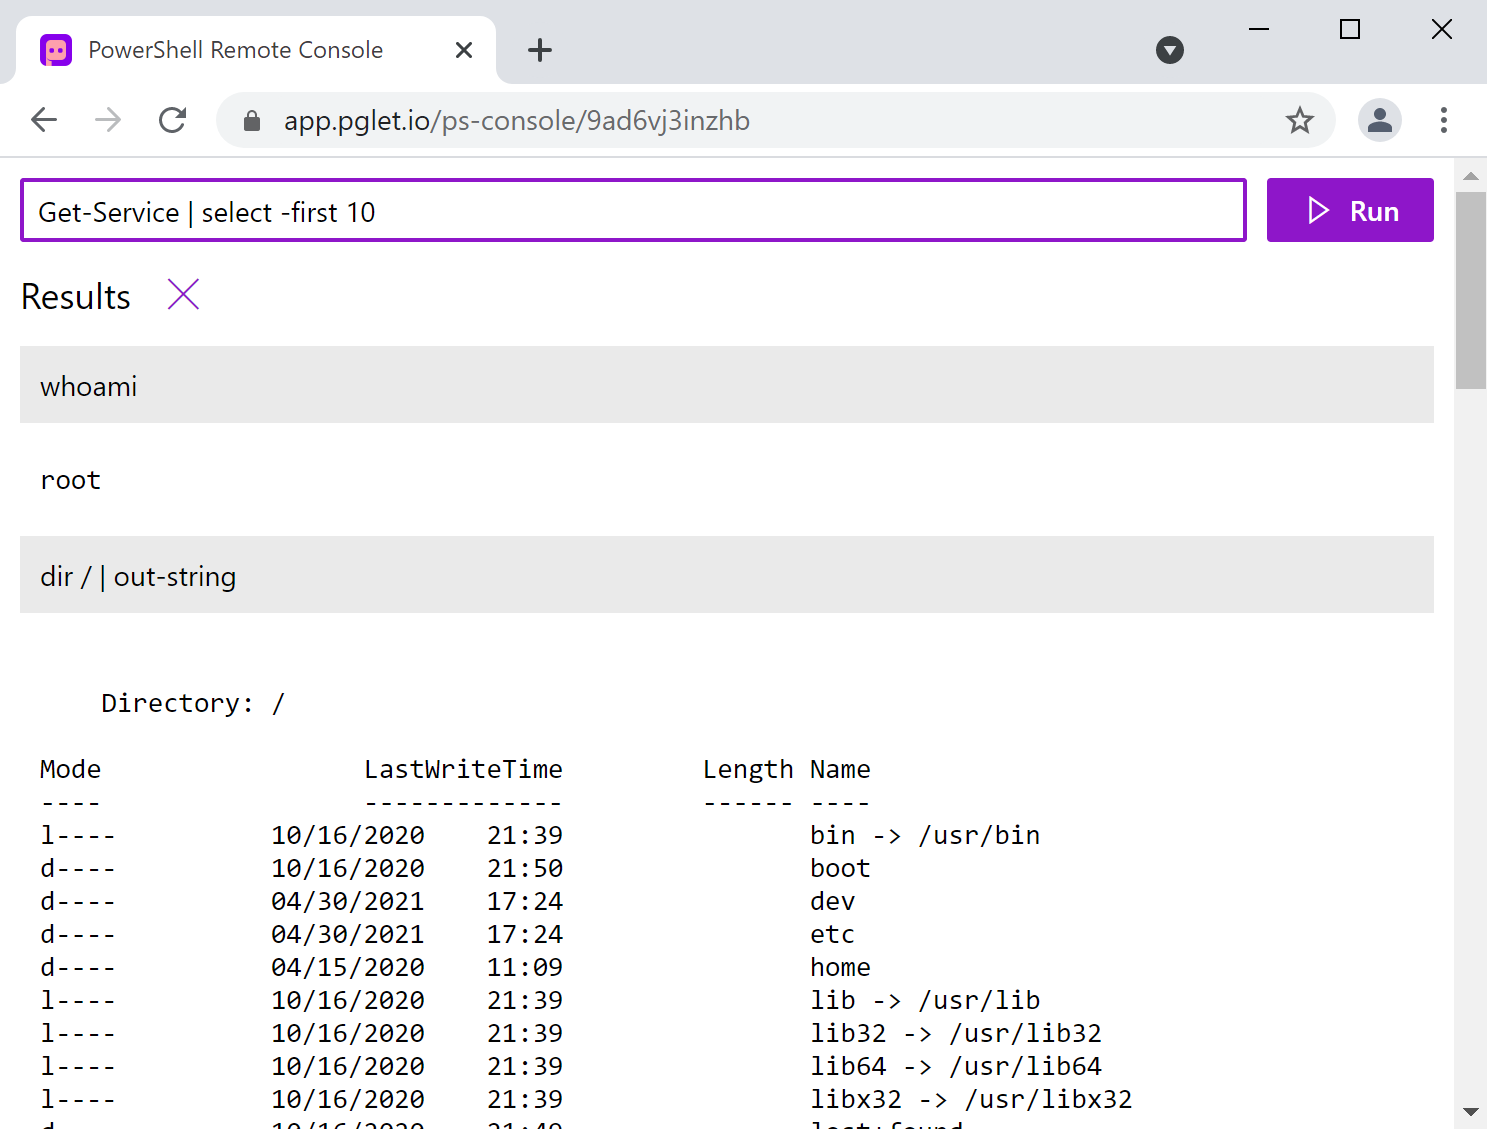
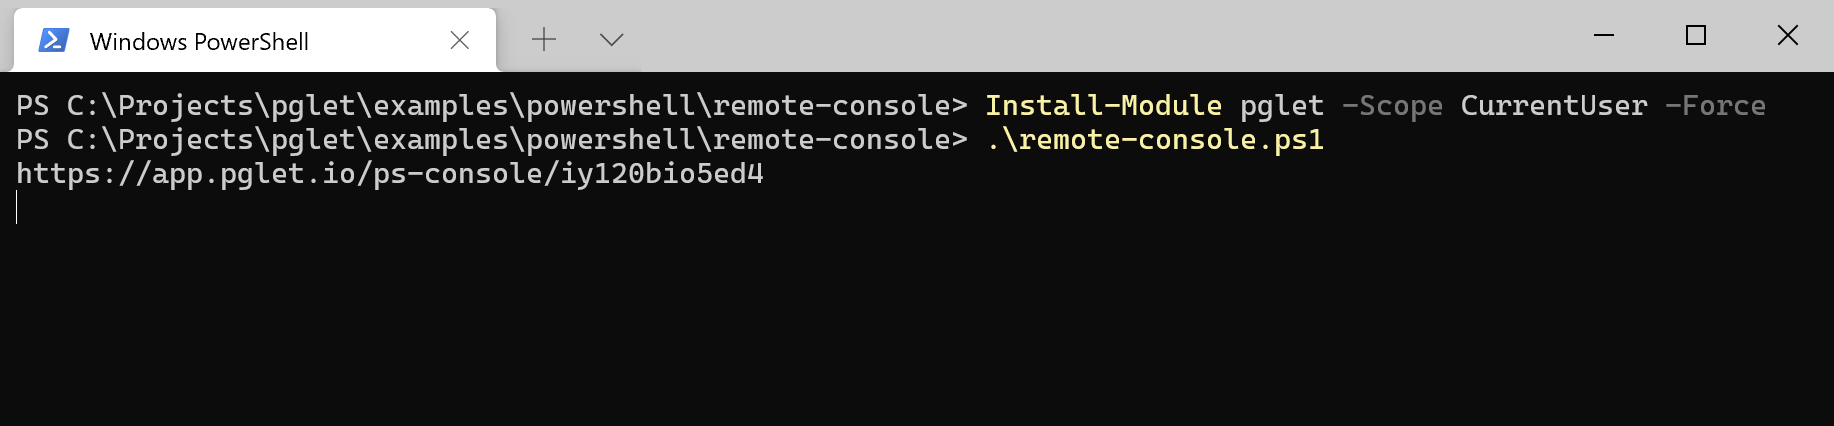
Import-Module pglet

Connect-PgletApp -Name "ps-console/*" -Web -ScriptBlock {
    $ErrorActionPreference = 'stop'

    $page = $PGLET_PAGE
    $page.Title = "PowerShell Remote Console"
    $page.HorizontalAlign = 'stretch'

    # Textbox with a command entered
    $cmd = TextBox -Placeholder "Type PowerShell command and click Run or press ENTER..." -Width '100%'

    # Event handler to call when "Run" button is clicked or Enter pressed
    $run_on_click = {
        $cmd_text = $cmd.value
        if ([string]::IsNullOrWhitespace($cmd_text)) {
            return
        }

        # disable textbox and Run button, add spinner while the command is evaluating
        $cmd.value = ''
        $command_panel.disabled = $true
        $results.controls.insert(0, (Text $cmd_text -BgColor 'neutralLight' -Padding 10))
        $results.controls.insert(1, (Spinner))
        $page.update()

        try {

            # run the command
            $result = Invoke-Expression $cmd_text

            # if result is Array present it as Grid; otherwise Text
            if ($result -is [System.Array]) {
                $result_control = Grid -Compact -Items $result
            } else {
                $result_control = Text -Value ($result | Out-String) -Pre -Padding 10
            }
        } catch {
            $result_control = Text -Value "$_" -Pre -Padding 10 -Color 'red'
        }

        # re-enable controls and replace spinner with the results
        $command_panel.disabled = $false
        $results.controls.removeAt(1)
        $results.controls.insert(1, $result_control)
        $page.update()
    }

    # container for command textbox and Run button
    $command_panel = Stack -Horizontal -OnSubmit $run_on_click -Controls @(
        $cmd
        Button -Text "Run" -Primary -Icon 'Play' -OnClick $run_on_click
    )

    # results container
    $results = Stack

    # "main" view combining all controls together
    $view = @(
        $command_panel
        Stack -Controls @(
            Stack -Horizontal -VerticalAlign Center -Controls @(
                Text 'Results' -Size large
                Button -Icon 'Clear' -Title 'Clear results' -OnClick {
                    $results.controls.clear()
                    $results.update()
                }
            )
            $results
        )
    )

    # display the "main" view onto the page
    $page.add($view)
}
In the program I used just a few Pglet controls: Textbox, Button, Spinner and Stack for the layout. Controls are organized into DOM and every time page.update() is called its state is sent to Pglet service.
When you run the script, a new random URL is generated for your app and printed to the console:
At the very top of the program there is main entry point for the app:
-Name parameter is a page URL and * means a randomly-generated string. You can add your own prefix to the random string or use another namespace, e.g. my-pages/ps-example-*.
If you want to tweak the app and test it locally, remove -Web parameter and a local Pglet server will be started. There is also self-hosted Pglet server if you need more control.
A ton of new controls were added such as navigation menu, toolbar, grid, tabs, dialog and panel. Now we feel confident Pglet allows to fully unleash your creativity and build a user interface of any complexity!
This release adds binaries for Linux ARM and Apple Silicon M1 - Go 1.16 made that possible. Now you can add remote web UI to your Raspberry PI apps or control what's going on in any IoT device.
Theming in Pglet takes similar approach as in Fluent UI Theme Designer - you choose primary, text, background colors and the theme is auto-magically generated from those colors. To change page theme in Pglet set page control properties: themePrimaryColor, themeTextColor, themeBackgroundColor. Check out Theme demo!
Button - additional types of Button control were implemented: compound buttons, icon buttons, toolbar, action and link buttons, buttons with context menus and split buttons. Check out Buttons demo!
Text - You can now control the styling of Text control such as color and background as well as border properties and text alignment within it (vertical alignment in center works too!). Check out Text demo!
Pglet Server now does not allow remote host clients by default. Remote hosts clients can be enabled with ALLOW_REMOTE_HOST_CLIENTS=true environment variable. Pglet Server Docker image set this variable by default.
Give Pglet a try and let us know what you think! There are multiple feedback channels available:
This is not a groundbreaking event shaking the World and it won't make any ripples on the Internet, but it's still very important milestone for us as it's a good chance to make functionality cut off and present Pglet to the public.
You probably won't be able to do a real app with Pglet yet, but we believe it's quite the MVP in a Technical Preview state. The core Pglet functionality is there: pages can be created, controls can be added, modified and removed with live updates streamed to users via WebSockets, page control events triggered by users are broadcasted back to your program - the entire concept's working. We've got basic layout (Stack) and data entry controls (Textbox, Button, etc.) to do simple apps and dashboards, but Fluent UI library, Pglet is based on, is huge and it's a lot more controls to do!
We've got Pglet client bindinds for 4 languages: Python, Bash, PowerShell and Node.js. We chose these languages for MVP to have a good sense of what might be involved in supporting another language. These are scriping non-typed environments mostly, but probably the next binding we do would be Go or C#. Python bindings is the most complete implementation with classes for every control and control event handlers.
We've got Pglet Service which is a hosted Pglet server which you can use right away to bring your web experiences to the web. For technical preview it's just a basic deployment on GAE (will do a separate blog post about that), but quite enough to play with.
It's been really exciting to work on Pglet during the last 6 months and we learned a lot. Being a C# and mostly Windows developer for more than 15 years it was an absolute pleasure to develop in Go: clean and simple language syntax, goroutines and channels, everything async by design, explicit exceptions management - I'll probably do another post about that experience! Making Pglet UI in React with TypeScript was fun as well: both are fantastic technologies! There is also a challenge to support multiple platforms. Pglet works on Windows, Linux and macOS and you need to constantly think about the experience on all 3 platforms and do a triple amount of tests, CI workflows and other chore things.
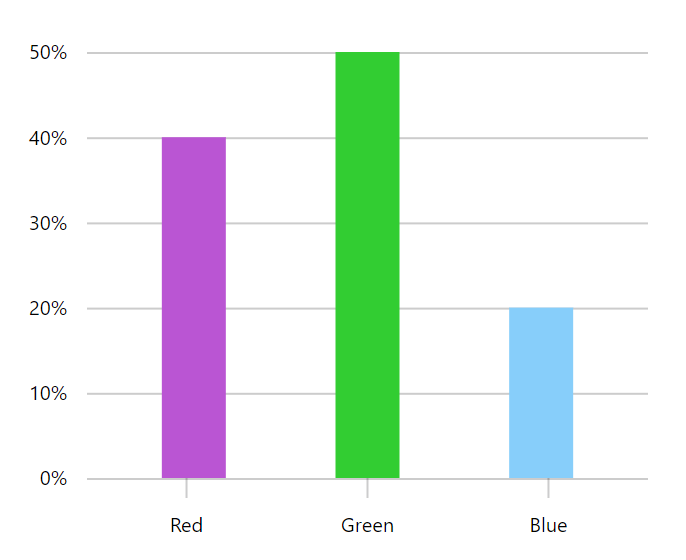
We are going to add more controls and improve existing ones. Pglet is still missing navigation controls like menus, toolbars and tabs. Grid is on top priority, for sure, and it's going to be the huge! Charts will be added as well, so you can build beautiful dashboards.
This year we are going to bring Pglet Service into production mode with a proper persistence, authentication and account/profile dashboards. All Pglet backend UI is going to be implemented with Pglet.
At this stage we are actively looking for any feedback to understand if the project idea is moving in the right direction. We'd be happy to know what would be your requirements, what's missing in Pglet, what's nice or inconvenient, what could be implemented with higher priority.
Feel free to give Pglet a try and let us know what you think! There are multiple feedback channels available:
Hi, I'm Feodor, the founder of AppVeyor - CI/CD service for software developers.
At AppVeyor, as any other startup, we do a lot of internal apps supporting the core business. Our users don't see those apps. These could be scripts for processing database data, monitoring dashboards, background apps for housekeeping, scheduled scripts for reporting, backend web apps for account management and billing.
Internal apps need User Interface (UI) to present progress/results and grab user input. The simplest form of UI is text console output. Console output can be easily produced from any program or script.
Text output has limitations. It could be hard to present complex structures like hierarhies or visualize the progress of multiple concurrent processes (e.g. copying files in parallel). There is no easy way to fill out the form. Plain text cannot be grouped into collapsible areas. We need rich UI for our internal apps.
Console output can be logged and studied later or you can sit in front of your computer and stare at log "tail". But we want to be mobile. We want to control internal apps from anywhere and any device. We want to share the progress of long-running process with colleagues or send a link to a realt-time dashboard to a manager. Maybe have "Approve" button in the middle of the script to proceed with irreversible actions. We want to collaborate on the results in a real-time. Does it mean we need to build another web app?
Building web apps is hard. Our small team is mostly DevOps. We all do development, deployment and maintenance. We are all good in doing backend coding in different languages: Bash, PowerShell, Python, C#, TypeScript. However, not every team member is a full-stack developer being able to create a web app. Frontend development is a completely different beast: HTTP, TLS, CGI, HTML, CSS, JavaScript, React, Vue, Angular, Svelte, WebPack and so on. Web development today has a steep learning curve.
Building secure web apps is even harder. Internal app works with sensitive company data (databases, keys, credentials, etc.) and presumably hosted in DMZ. You simply can't allow any developer being able to deploy web app with an access to internal resources and available to the whole world.
Let's say you are the developer responsible for deployment and maintenance of backend services and database - DevOp. You mostly work with Golang and use Bash or Python for writing scripts and tools. Your team asked you to implement a simple real-time dashboard with some metrics from backend services. Dashboard should be accessible outside your org.
Should you do a web app? You don't have much experience of writing web apps. Alright, you know the basics of HTML/CSS, you know how to use StackOverflow, but how do you start with the app? Should it be IIS + FastCGI or Flask, plain HTML + jQuery or React, or something else?
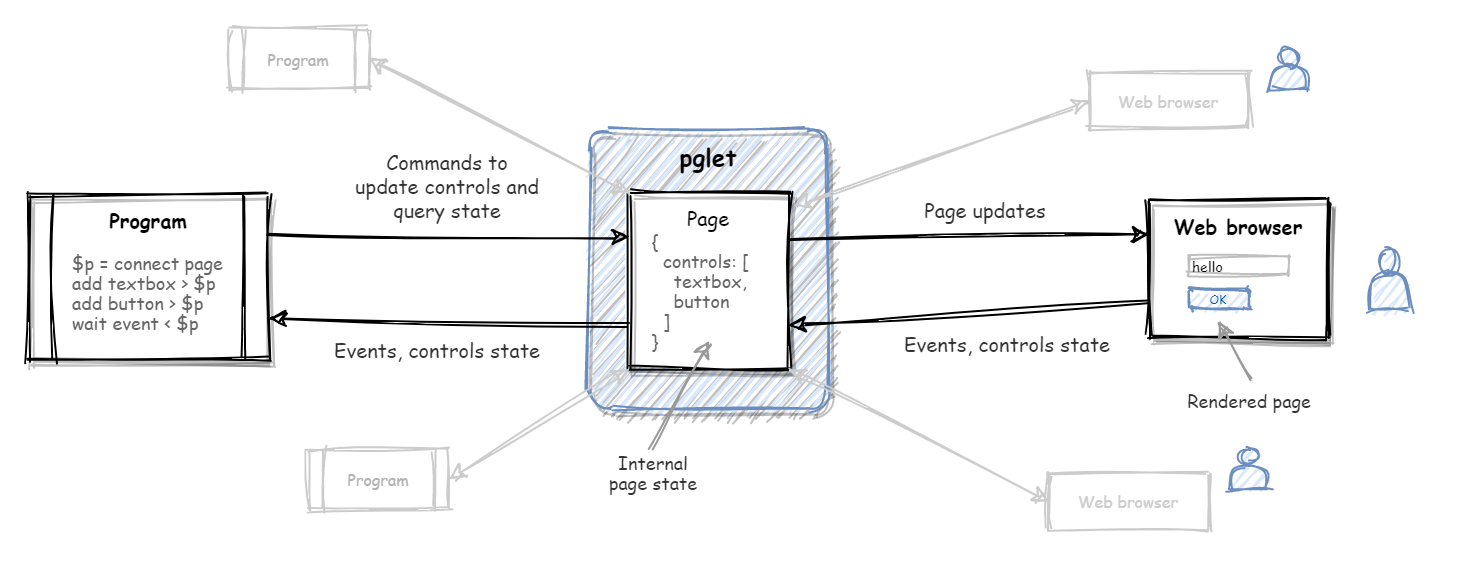
Pglet gives you a page, a set of nice-looking controls and the API to arrange those controls on a page and query their state.
Pglet is the tool that hosts virtual pages for you. Think of a page as a "canvas", a "hub", an "app" where both your programs and users collaborate. Programs use an API to control page contents and listen to the events generated by users. Users view page in their browsers and continuosly receive real-time page updates. When in- API is just plain-text commands like "add column A", "add text B to column A", "get the value of textbox C", "wait until button D is clicked" - it's easy to format/parse strings in any programming language.
Bash-like pseudo-code for a simple app greeting user by the name could look like the following:
# create/connect to a page and return its "handle" (named pipe) $p=(pglet page connect "myapp") # display entry form echo'add row'>$p echo'add col id=form to=row'>$p echo'add textbox id=yourName to=form'>$p echo'add button id=submit to=form'>$p # listen for events coming from a page whileread eventName eventTarget <"$p.events" do # user fills out the form and clicks "submit" button if[["$eventTarget"=="submit"&&"$eventName"=="click"]];then # read textbox value echo'get yourName value'>$p read$yourName<$p # replace forms contents with the greeting echo'clear form'>$p echo"add text value='Thank you, $yourName!' to=form">$p fi done
You can build a web app in Bash! No HTML, no templates, no spaghetti code. You don't need to care about the design of your internal app - you get fully-featured controls with "standard" look-n-feel. What you care about is the time you need to deliver the required functionality.
Standard controls: layout, data, form. Skins supported.
Fast and simple API via named pipes - call from Bash, PowerShell and any other language.
Secure by design. Program makes calls to Pglet to update/query UI. Pglet doesn't have access and knows nothing about internal resources located behind the firewall. Pglet keeps no sensitive data such as connection strings, credentials or certificates.
Two types of pages can be hosted:
Shared page: multiple programs/scripts can connect to the same page and multiple users can view/interact with the same page.
App: a new session is created for every connected user; multiple programs/scripts can serve user sessions (load-balancing).